Friday, April 12, 2013

Put Your Game Face on - Xbox Cake

Posted by Laura at 11:00 AM 0 comments
I love when people say to me, "you can do a/an ______ cake."

I don't know. I've never tried!

When a friend of mine called me up one day and said, "You can make an Xbox cake, right?" i just laughed.

"I don't know, I've never made one before. I've only made the Rock Band Cake," I said.

Her reply, "Oh ok... well, you're gonna make an Xbox cake. No pressure."
Yikes! Where do you even start on something like this when you've never made a REAL 3D cake?
The console.

I just stared at the Xbox for a good 30 mintes to gather my thoughts and ideas. And then I decided to trace the console out. When the cake was cooled, I put the cut out of the Xbox shape on the cake and cut it out. Easy.

Than the controller. Hmm... Not so easy. But I sat there at the tray with the controller in front of me and carved it a little at a time. Here's a tip: I use the food coloring markers to draw it out before I cut.

After everything was cut and wrapped I took the little details and started working on those. I cut out the air vents, the buttons, the side panels, the analogs. All of it.

I used a bit of water and attached all the pieces. Then a little bit of icing for some last details and voila... you have an Xbox cake.

I've seen some pretty awesome Xbox cakes out there, but I'm still VERY proud of mine. My second 3D cake. Second! Imagine that. I think I have a gift for "winging" it.


Thursday, April 11, 2013

I go hard in the 3D cakes!

Posted by Laura at 10:00 AM 0 comments
Here's my Rock Band tribute cake. It was also made as a send off to a dear friend that was moving away.

What better way to send her off than a night of good old fashioned Rock Band?

So we did what we do best: go totally overboard and theme out our Rock Band party. We sprayed our hair pink, dressed in our Rock and Roll gear, set up the instruments and jammed out all night till our hands hurt and our voices were gone.

 But when it came time for dessert, my friends were in for quite a surprise: My first ever 3D cake.

The cake itself was basic vanilla with butter cream icing. Of course, I used my trusty Wilton cake recipe. The time and effort was all in the decorating.

I did the entire cake in homemade butter cream icing (one that's an absolute secret). I free hand piped the side of the cake that mimics the bars where the notes show up on the screen when you play Rock Band. I made all the instruments and Rock Band logo in fondant icing.
While it might not be the best, the most outrageous or even the most difficult cake, this one will always be my favorite. It was my first time stepping outside of that "safe" cake zone and doing something crazy.
It's also the day I learned I had more patience than I ever thought.


Wednesday, April 10, 2013

Something's Fishy... Goldfish Cupcakes!

Posted by Laura at 1:43 PM 0 comments
So easy to make and everyone loves them!


These are a fun treat for kids parties, fish themed get togethers or - my favorite - "just because."

Whenever you decide to make them you will be pleasantly surprised by the sweet and salty combination.

Here's what you need:
  • Goldfish (your preference: color, pretzel, original)
  • Granola
  • Green Fruit Roll Up (or Laffy Taffy)
  • Your Favorite Ccupcake Mix
  • Your Favorite Icing
  • 24 Cupcake Paper Cups
  • Cupcake Baking Tray
  • Large Round Ssprinkles
  • Blue Food Coloring
 
SO let's wash our hands and get started!
 
Start out by checking your cake recipe for the specific baking temperature, and preheat your oven to that degree.

1. Mix your favorite white cake batter.

2. Arrange 12 white paper baking cups in one of your cupcake baking trays (remember they cook better when doing them one at a time, but it's ok to do two trays if it fits in your oven). Fill 2/3 the way (HINT: fill a ziplock bag with your batter and cut a tiny hole in the bottom corner to squeeze batter into the cups).

3. Bake cupcakes for the recommended time of your recipe, or until the tops are slightly golden

4. Test the center with a toothpick to see if it comes out clean. If the inside is still wet and the outside is done, turn down the temperature of your oven and cover with aluminum foil to finish baking.

5. Cool cupcakes on wire rack - careful not to burn yourself getting them out.

6. Mix your favorite vanilla frosting recipe, adding a very light blue tint with the blue food coloring (HINT: start by adding only 3 drops. If you need more, add one at a time).

7. When your cupcakes have cooled, frost them with your blue frosting.

8. Lay out either your fruit roll up or laffy taffy and cut into one inch pieces. Pinch the bottom half so it has that leaf look.
 
9. Place one leaf on the right and one leaf on the left side of the cupcake.

10. Drop a pinch of granola on the bottom in between the leaves (this will be your gravel).

11. Put your goldfish on top (I used two).

12. Add the finishing touches by placing two or three large white sprinkles above the fish so it looks like air bubbles.

Ta-da!

Now you've got some pretty impressive cupcakes that LOOK a lot harder to make then they actually are.


Friday, January 21, 2011

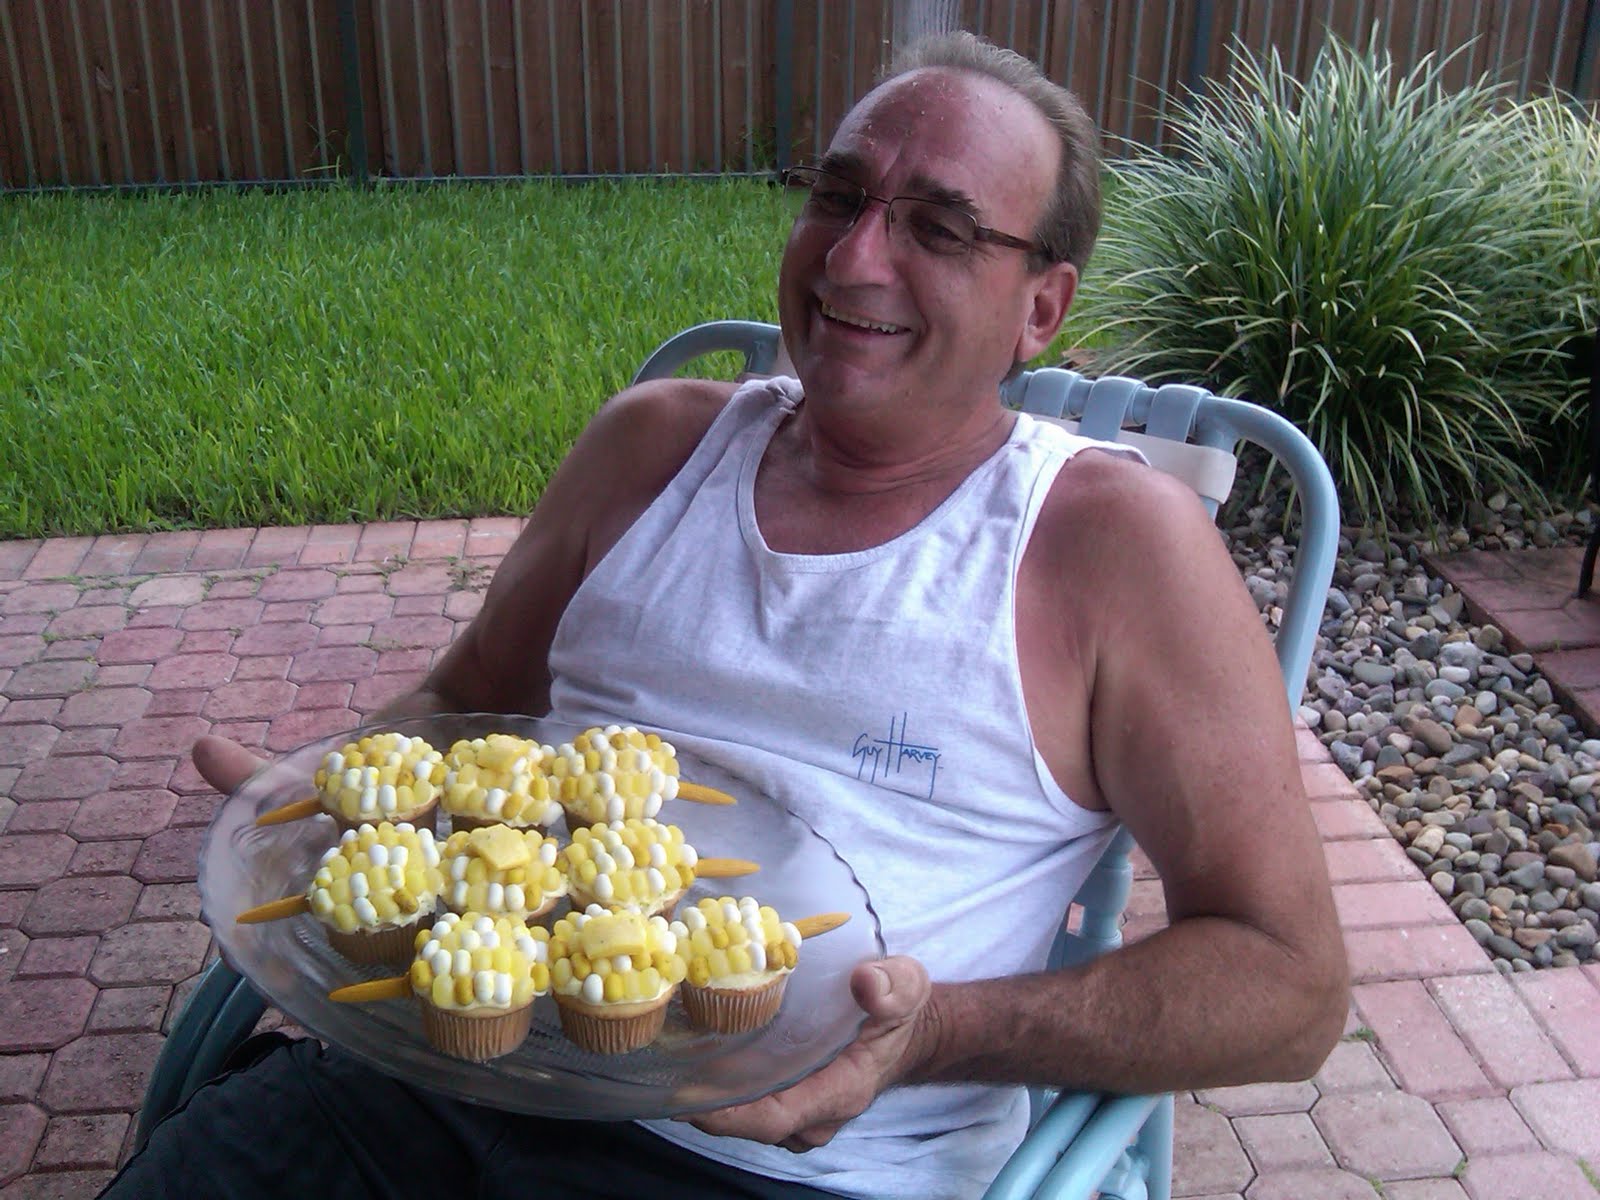
Just in time for Spring... Corn on the Cob Cupcakes!

Posted by Laura at 9:00 AM 0 comments
This dessert is a hit for BBQs!

Not too long ago my uncle was told he couldn't eat corn on the cob... one of his favorites. Anyone who knows me, knows that I am always waiting for that perfect opportunity to pull a prank on someone. Here was my chance.

I decided to make him corn on the cob - in dessert form. And so was born, the corn on the cob cupcake.

They are very simple to make - and not too expensive either.

So here's what you need
  • Your Favorite White Cake Recipe - which I included in the previous blog
  • Your Favorite Vanilla Frosting Recipe - which I included in the previous blog
  • 2 Cups Jelly Belly Jelly Beans (in various yellows like lemon, banana, pineapple and even some white like vanilla or toasted marshmallow)
  • 4 yellow salt water taffy (or you can use 2 pieces of laffy taffy)
  • Black and White colored sprinkles
  • Corn Ear Holders
  • White Paper Baking Cups
  • Yellow Food Coloring
Now that you've got your supplies, it's time to get cooking. I always start by laying out my ingredients and mixing bowls and such so I'm not opening the cabinets with dirty hands.

Ready? Ok let's wash our hands and get right in...

Here's what you're gonna do

1. Check your cake recipe for your specific baking temperature, and preheat your oven to that degree.

2. Start mixing your favorite white cake batter.

3. Arrange 12 white paper baking cups in your Cupcake Tin, and fill 2/3 the way up (HINT: fill a ziplock bag with your batter and cut a tiny hole in the bottom corner to squeeze batter into the cups).

4. Bake cupcakes for the recommended time of your recipe, or until the tops are slightly golden. Then cool them on wire rack - careful not to burn yourself getting them out.

5. Mix your favorite vanilla frosting recipe, adding a very light yellow tint with the yellow food coloring (HINT: start by adding only 3 drops. If you need more, add one at a time).

6. When your cupcakes have cooled, frost them with your yellow frosting.

7. Arrange 3 cupcakes next to each other on a corn serving dish, a platter, or picnic type plate.

8. Start arranging jelly beans in random order. You want to use a lot of the solid yellow color, throwing in some banana colored, toasted marshmallow and a few solid white beans every now and then (HINT: It's easiest to start with a middle line, and work your way to the edges).

9. Flatten the yellow taffy while it's still in its wrapper (HINT: If you don't have a rolling pin, use a sturdy pencil or marker). Unwrap it and using scissors, cut it into a square shape. You can mold it quite easily into a buttery looking pad with smooth edges. Place pad on top of one of the jelly-beaned cupcakes.

10. Sprinkle some black & white sprinkles on top of the completed cupcakes. Be sure to get a few specs on the butter pad too.

11. Push a corn ear holder on each end of the outside cupcakes.

And that's it!!! Now you can serve them on your tray or platter and everyone will get a good laugh! I know we sure did!

Wilton's Buttercream Icing

Posted by Laura at 8:55 AM 0 comments
So if I prefer Wilton's cake mix... you can probably guess that I use their icing too.

Well you guessed right!

And here it is...
  • 1/2 cup solid vegetable shortening
  • 1/2 cup (1 stick) butter or margarine softened
  • 1 teaspoon vanilla extract
  • 4 cups sifted confectioners' sugar (approximately 1 lb.)
  • 2 tablespoons milk

For Medium Consistency

1. In large bowl, cream shortening and butter with electric mixer. Add vanilla.

2. Gradually add sugar, one cup at a time, beating well on medium speed. Scrape sides and bottom of bowl often.

3. When all sugar has been mixed in, icing will appear dry. Add milk and beat at medium speed until light and fluffy. Keep bowl covered with a damp cloth until ready to use.

HINT: For best results, keep icing bowl in refrigerator when not in use. Refrigerated in an airtight container, this icing can be stored 2 weeks. Rewhip before using.


For thin (spreading) consistency icing

1. Add 2 tablespoons light corn syrup, water or milk.


For Pure White Icing (stiff consistency):

1. Omit butter; substitute an additional 1/2 cup shortening for butter and add 1/2 teaspoon No-Color Butter Flavor.

2. Add up to 4 tablespoons light corn syrup, water or milk to thin for icing cakes.

Wilton's White Cake Recipe

Posted by Laura at 8:48 AM 0 comments
My favorite White cake recipe has to be from Wilton.

After all, they are the baking genius' of the world. So every time I make cupcakes from the soul I use this recipe... all other times if I'm in a rush I'll use Betty Crocker boxed cake mix, but shhhhh.

So here's a quick look at their recipe should you ever want to try it.
  • 6 cups cake flour sifted
  • 2 tablespoons baking powder
  • 1 1/2 cups butter or margarine, softened
  • 3 cups granulated sugar
  • 2 cups milk
  • 1 teaspoon pure vanilla extract
  • 12 egg whites
1. Preheat oven to 325°F. Grease bottom of pans and line with waxed paper or parchment paper. (Click here for complete instructions on preparing baking pans.)

2. Sift together flour and baking powder. Set aside.

3. Cream butter and sugar together until light and fluffy. Set aside.

4. Beat egg whites until stiff, but not dry. Set aside.

5. With mixer at slow speed, add flour mixture to butter mixture, alternately with milk. Beat well after each addition.

6. Beat in vanilla extract. Gently fold egg whites into batter.

7. Pour into prepared pans and bake until toothpick inserted into center comes out clean.

Wednesday, August 19, 2009

It's too damn early...

Posted by Laura at 12:18 PM 0 comments
So our system is down at work and I figured I would check out my mobile blogging!

As I'm sitting at my desk with my morning coffee (eyes burning, uncontrollable yawns) it hits me...

"If I think that 7 am is too early, how am I going to survive a bakery at 4 am?"

Perhaps the adrenaline of baking up yummy goods for the community will be enough. Or maybe after a while I will wonder why I torture myself. Truth is, when I get up to go fishing at 4 am I hate it. But - I also get over it pretty quickly.

I guess when its something you are truly passionate about you stop caring about the things that would normally be considered a nuisance.

I used to feel that "high" at my job now. Only it was because I truly felt that I wanted to be a writer. And part of me will always enjoy writing, but as my love for baking grows I start to notice those "little things" that never used to bother me. I suppose I just realize more and more that I don't want to be *here* as a writer. I want to be *there* as a baker.

Hmmm. Some day. For now, I will suck it up, chug the remainder of my now cold coffee and be a writer. And I will do it well because I know that as soon as I get home, I get to be a baker!

Sent Via Verizon Wireless Blackberry

If you like it - Share it!

Ą

Queen of Sweets Copyright 2009 Sweet Cupcake Designed by Ipiet Templates Image by Tadpole's Notez